Our Ancestors’ Fascinating Journey Part VI
The Year of Our Lord 1637.
After this recent hiatus, it may be well to refresh our memories as to what this blog is all about.
In Part I we asked you to imagine that it’s the mid-1600’s. To close your eyes and envision yourself sitting with William and Anne Nickerson in their homestead in Chatham. The fire in the hearth is flickering and Anne occasionally rises to stir a chowder in the kettle while William, tired from a day at his loom and his small blacksmith shop, sits back and lights his pipe. Imagine you are in the chair closest to Anne’s spinning wheel, now idle, chatting with them about their life and times.
In this blog series, we shall share with you some of the answers as to how our smart and hardy ancestors coped with living in an age long before the Internet, the microwave, antibiotics or GPS. How they could be self-sustaining in their New World journey.
In Part V, we left Will, Anne, children et. al. having just arrived in Salem after navigating an arduous trudge through thick forests unlike anything they had seen in England, using very inventive means of telling direction.
They were welcomed in Salem, fed and given much needed rest. The next day their friends helped them unpack. Will’s loom came through the sea voyage and trek without damage. Their clothing having gotten wet during the voyage, had become musty and showed signs of mold. Good thing there was a creek nearby to wash those clothes.
Out of one of their bags fell many biscuits, called “Hardtack.” This gave everyone a good laugh as the hardtack nearly chipped the wooden floor as they bounced everywhere! One of their new friends said that she still had some from her voyage three years before and that they were still as good as the day she baked them in Norwich.
Another friend opined, “Though it may have been fire that brought us humans out of the darkness and into the light. Just as powerful was the advent of agriculture that allowed us to build communities and stop running and gunning for survival. Further without wheat and thus flour, our nutritional needs would have been unmet, and we may have never advanced to this point. Flour and water create a staple without which invention sea exploration would have been nearly impossible. This is a food that has fed sailors and soldiers at war for thousands of years. I’m talking about Hardtacks.”
Not familiar with the name? It goes by many others as well, such as, cabin bread, pilot bread, sea biscuit, sea bread, ship’s biscuit and as we will discuss now, hardtack.
The journey across the Atlantic was a harsh one that required a food source that could last the long journey. The hardtack offered a carbohydrate energy source that was simply void of moisture.
The brilliant thing about hardtacks is that they are little more than water, flour and salt. Therefore, they last an eternity. The desire to add things for flavor and texture is alluring but remember the true purpose of this food is to last forever, hence the reason our ancestors appreciated this food! The addition of things like fats that can go rancid will shorten the lifespan of this food.
The following will provide you with a basic recipe for creating these biscuits.
Ingredients
- 3 cups of flour
- 1 cup of water
- 2 teaspoons of salt
Hardware
- Pizza stone or cookie sheet
- Large mixing bowl
- Rolling pin
- Pizza cutter (not necessary)
- Fork
- Big nail
Preheat the oven to 350 degrees or fire up your beehive oven.
Put the flour into the mixing bowl, add the salt and make sure that it gets well integrated into the flour.
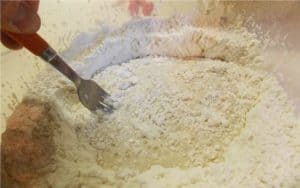
Then create a well (illustrated below) in the center of the flour.
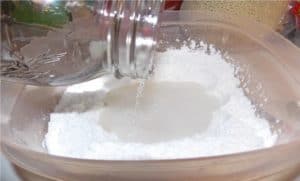
Pour small amounts of water into the well and slowly begin to incorporate the flour into the water. With your fork knock the sides into the well allowing the water to begin to thicken. This technique with the well allows you to control how much water you add into your mixture.
Once the mix gets doughy turn it out onto a floured table. This mass will still be sticky, and it will take some additional flour and elbow grease to make it smooth.
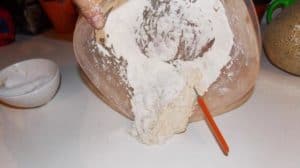
Begin needing the dough. Add flour until it stops sticking to the table and your hands. The dough will get smooth and soft after just a couple minutes.
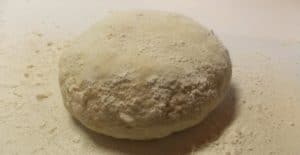
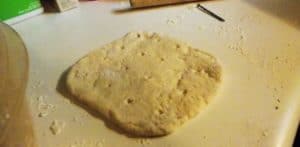
Once your dough has come together you can begin to round it out. You want smooth dough that won’t stick to your rolling pin or whatever else you use to shape your hardtack. The picture below shows the dough ready for the next steps.
There are several ways you can manipulate your hardtacks into various shapes. A rolling pin and a pizza cutter are easy to use.

Use the rolling pin to form a large square. If you have trouble forming the square from your round ball of dough, simply use the pizza cutter to trim the edges. The dough should be about 1/2 inch thick.
Utilize a common household nail to poke holes into the dough. This allows the center of your hardtack to dry out quicker and more thoroughly in the oven. For a square hardtack poke 16 holes straight through the dough.
You can also break your dough down into smaller individual portions. This allows the portions to bake quicker.
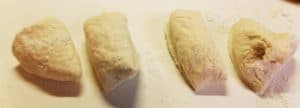
From here shape the portions into smaller circles. Punch holes in them using the nail.
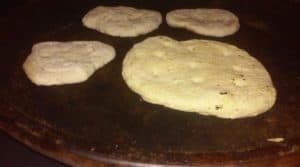
When you think about this ancient recipe and how Anne must have prepared them all those years ago it is hard to throw these things on a Teflon coated cookie sheet and bake them like chocolate chip cookies. Use a pizza stone or invest in a clay planter bottom at your local home and garden store.
Lay your hardtacks out and give them enough space to bake evenly. Place them in the oven for 30 mins.
This 30-minute cook time is merely the first of at least two bakes these hard biscuits will go through. This process, although time consuming, will assure that there is no remaining moisture in your hardtacks. Any moisture becomes the enemy of this process of shelf stability. Some old recipes call for 3 and even 4 times in the oven. These hardtacks must have been closer kin to bricks than food.
After the 30 minutes is over pull out the hardtacks and allow them to cool. They will steam and get hard. They will not be hard or dry enough to store at this point. After having cooled them for about 20 minutes place them back in the oven. Set the timer for one hour.
It will be this bake that thoroughly dries your hardtack and begins to give them a pleasing bit of color.
At the end of the hour, turn your oven off. DO NOT REMOVE THE HARDTACKS. The heat will drop in the oven while your hardtacks slowly dry even further. This will greatly aid in evaporating any remaining moisture left inside.
Now you have created some decent shelf stable hardtacks. Unlike most foods you spend time making from scratch we cannot say you will be delighted to try them. You see they are dry and hard.
Those are basically the two features for your palate when it comes to hardtacks. It will not get much better than that and really it should not. Remember if you decide to flavor them up with butter or herbs this will simply add ingredients that will drastically shorten the shelf life of your hardtacks. Keep it simple and they will last forever.
You must understand that the “hard” in these hardtacks does not do them justice. If you do decide to taste the fruits of your labor, we advise you to take some precautions. Make sure you are chewing with the best teeth you have. If there is anything loose or filled in, it may very well come out or even shatter.
All jokes aside this is an ancient food that has carried entire nations through tough times. If you follow the recipe above and store your hardtacks properly there is no doubt these hardtacks will do the same for you and your family. Just as it did for our ancestors on their fascinating journey through Cape Cod.
If you try making these hardtacks, please let us know how they come out by posting in the below comments section. Include pictures if you like!
Let me share with you my favorite way to eat hardtacks. I crumble the hardtack, add some brown sugar and hot water, then I add some whiskey. I call it pudding and have yet to break any teeth! And in the words of Rachael Ray, it is “deli-i-ish!”
Part VII coming soon will have the recipe for Pemmican! Look for it.